
My camera drops offline at times. What should I do? Your camera periodically let's the server know it is online. When the server does not receive such signal for a certain period of time, it will assume that the camera is offline and this will show in...
Your camera periodically let's the server know it is online. When the server does not receive such signal for a certain period of time, it will assume that the camera is offline and this will show in the status of your camera.
There are several reasons why those signals may not reach your server. It may be that your camera is turned off. In that case you simply turn it back on again. Another reason may be your Wi-Fi connection if this connection is either weak or intermittent.
Some devices can interfere with your camera unit. Make sure your camera is at least three (3) feet away from devices such as antennas, Wi-Fi enabled devices, routers, microwave ovens, televisions, radios or cordless telephones.
It may also be the case that your camera appears offline whereas it isn't (this is the case if you still receive notifications for instance).
To see whether that is the case you may want to try two things:
a. Refresh your camera list by pulling it down with your finger.
b. Turn the camera off and on again.
I have problems with the setup. Could there be an issue with my router? Most modern routers should allow your camera to connect. If your router does not allow you to make modifications to settings, it may be incompatible.
Please ensure that:
• Both your camera and your mobile device are connected to the same Wi-Fi® network when you do setup, reset or a firmware upgrade.
• Your router has the 2.4 GHz band enabled. The camera will not work on 5 GHz networks
• Your router has DHCP enabled. This allows it to provide the necessary IP address to the camera you wish to connect (Static IP addresses are currently not supported by the app).
• Your router does not have any devices listed as blocked, including your camera. It may be that your router’s settings only allow identified devices to connect (in which case ‘MAC’ and port info may be required – see more details below) – or your router only allows a limited number of devices to connect. In general this setting can be found under: Advanced Settings > Admin > Attached devices
• There are no spaces or hidden characters at the beginning of the SSID name. For example an SSID name of “ abc123” will not allow your camera to connect, whereas “abc123” (without the space) will allow a connection.
• The SSID name of your Wi-Fi network is written in regular characters only. Special characters, and characters used in certain languages may cause problems. Please avoid using non-English characters.
• If issues persist, you may need to reboot your router, camera or both
• Ensure that there are no devices near your router or camera that could cause interference. Such devices include other Wi-Fi enabled devices, microwaves, antennas, cordless or cellular telephones, or televisions.
If required, here the details of the open ports used by the camera:
Outbound ports used:
• Port 1935 for RTMP (TCP)
• Port 80 for HTTP Command and File Upload/Download (TCP)
• Port 3478 for STUN (UDP)
• P2P Ports: Inbound and Outbound Ports >50000 (UDP)
Below we give you some indications on how to change your router settings as well as some troubleshooting tips:
Firstly, you will need to access the configuration page of your router. To do this, type any of the following into your browser’s address bar (where you’d normally enter the URL of a website):
• 192.168.0.1 or 192.168.1.1 or 192.168.2.1
If this is your first time accessing your router’s configuration page, you will be required to enter a username and a password. Usually the default credentials will be:
username: “admin” / password: “admin”
OR
username: “user” / password: “user”
OR
username: “1234” / password: “1234”
You may also want to check the label at the bottom of your router as at times the default credentials are printed there.
Having correctly entered your username and password, you will arrive at your router’s administration desk, where you will be able to change its wireless settings. To change the wireless security settings, select Wireless > Security > Encryption.
You will then have the option to select the encryption settings you’d like your router to use. For example, you can select WEP or WPA Personal encryption.
Please note that WEP encryption offers the least security and WPA2 personal encryption offers more security.
When you are accessing your Camera via a network different from your home network (over the internet) your video automatically times out after 5 minutes. You can click on the Camera again from the Android™/iOS application to start streaming again. If you are accessing from your web browser, then you can press on the reload button to start viewing your Camera video stream again.
It is possible to access and view your camera using several devices. However, as each camera only supports one account, you will need to use the same login details (username and password) to login on each additional smart device to view the camera. It is not possible to create multiple accounts to access the same one camera.
You can access your camera on up to 4 devices at the same time, if all devices are connected to the same home Wi-Fi network. If you are viewing your camera remotely (when the smart devices are on a different network than the camera), you can have up to 10 devices connected at the same time.
There are several reasons why your camera may not be visible when pairing. Please try the following steps:
1. Please reset the camera to setup mode and try again. Press and hold the PAIR/RESET button on the bottom of the camera until you hear a beep. Wait for the camera to restart. The camera will say "Ready to start pairing." When you hear the announcement, proceed with pairing through the app.
2. Check to make sure you are on the same Wi-Fi network as your camera.
3. Make sure your Android™ or iOS device are using a 2.4 GHz Wi-Fi network when connecting. Your Motorola camera will not work on 5 GHz Wi-Fi networks.
4. Ensure that your camera is located at least 3 feet / 1 meter away from other Wi-Fi devices, including smartphones, modems and routers. Locating a camera too close to another Wi-Fi device may cause interference.
5. Temporarily disable any "Automatic Switching" settings for Wi-Fi on your Android os iOS device. Many devices have a feature that will automatically switch off of networks that do not provide internet. These settings may interfere with the installation process on your camera. After disabling the Automatic Switching, attempt to install the camera again.
6. Temporarily disable mobile data on your Android or iOS device, then attempt to install the camera again.
7. Try pairing your camera to a different Android or iOS device. Once the camera is paired to a different device, you should be able to log in to your account and access your camera.
To delete a camera from your camera list, go to the Cameras tab. Tap on the 'Settings' icon ![]() of the camera you want to remove.
of the camera you want to remove.
In the Camera Settings menu, scroll down to "Remove this camera?" and click OK.
This usually occurs when you are using the Pan/Tilt feature and your network bandwidth/connectivity is poor.
1. Check your Wi-Fi signal strength on your mobile device or home viewer. If your signal is poor, move to a location where your signal is increased. It may be necessary to relocate your camera or Wi-Fi router for better signal strength.
2. This might occur when you are accessing your camera in Remote mode. Make sure your mobile device or home viewer are on the same Wi-Fi network as your device. If your smartphone is using your router's 5 GHZ network, please switch to the 2.4 GHz network.
3. If your camera is in a location with poor Wi-Fi signal, you may want to connect the camera using a wired ethernet connection.
4. Interference from other Wi-Fi networks, antennas, microwaves, radio sources, cordless telephones or other devices may affect the camera connection.
Sound and motion sensitivity levels can be adjusted by clicking on the 'gear' ![]() icon on the camera view. Select Motion Detection Settings.
icon on the camera view. Select Motion Detection Settings.
Switch Motion detection from Off to On. Once Motion Detection is enabled, you can modify the Motion Sensitivity.
Please note: Low sensitivity will result in less notifications whilst High sensitivity will result in more.
On some Android™ devices, there is a feature called "Smart network switch" or "Auto network switch" which allows the device to automatically change networks if internet service is not detected. While this has no effect on the hellosecurity-DIY app during regular use, this can cause issues during pairing Step 4 when assigning a Wi-Fi network for the camera to use. If you are having difficulty with pairing your camera at Step 4, please do the following:
1. Disable "Smart network switch" or "Auto network switch" on your Android device. The feature name may vary depending on the manufacturer of your Android device. The feature is not available on all Android devices. The feature is usually found in Wi-Fi settings.
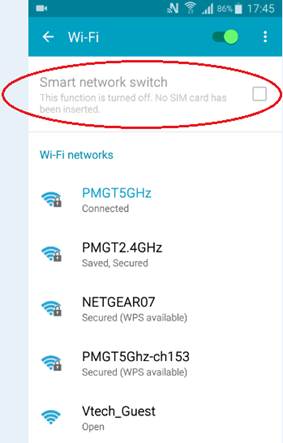
2. Disable Mobile Data on your Android device. On some devices, you can disable mobile data through the pull-down menu. On other devices it is necessary to go into Settings. On some devices you may need to enter Airplane Mode, then re-enable Wi-Fi.
After modifying the above Wi-Fi and Mobile Data settings, please try pairing again.
Once the pairing has been completed, you may re-enable both "Smart network switch"/"Auto network switch", and mobile data.
Yes, this is normal and safe. Due to the use of infrared for the night vision feature, the camera may feel slightly warmer than it does during normal daytime operation.
The LED indicates one of the following statuses for your camera:
LED is solid / not blinking:
- If the LED is solid and not blinking, your camera is successfully connected to the Wi-Fi® network.
Slow blinking / flashing:
- Your camera is in setup mode. You can add the camera to your account in this mode. Once out of the box and connected to power, your camera will enter setup mode. To return your camera to setup mode at any time, press and hold the PAIR button on the bottom of the camera for several seconds until you hear a beep.
Your camera is either connecting to the router or has lost a previously established link to the router. Please ensure that your camera is within range of the router’s Wi-Fi® signal.
LED is off and not blinking:
- Your camera likely has no power. Check to make sure your camera is connected to a powered outlet, not controlled by a wall switch.
- Your camera may have the LED disabled through the app. Check the camera settings to re-enabled the LED.
The blue LED also blinks:
- When you use the camera in combination with a handheld and the handheld is plugged in.
- When you are actively viewing from the app, the blue led will blink, but as soon as you exit the app, it will stop.
- This is different when you have background monitoring activated. In that case the blue LED continues to blink (and is alternated with the red LED).
- When viewing the camera when using the web app, the blue LED will also blink.
For both PC and Mac®, here are the following browsers supported:
Microsoft Edge
Internet Explorer® version 10 or 11
Firefox® version (latest released version)
Chrome™ version (latest released version)
Safari® version (latest released version)
The zoom function comes as a digital pinch to zoom functionality and works the same way you'd enlarge a picture on your mobile device. In the Camera List, tap on the camera to bring up the live feed. Once you view the camera, use a digital pinch to zoom in and out.
If you are continuing to have issues with your live feed on the hellosecurity-DIY app when connected to your home Wi-Fi network, there are additional steps you can take to help improve the camera's live feed. .
If your Wi-Fi network has both 2.4GHz and 5GHz frequencies available: Set your Android or iOS device to use the 5GHz Wi-Fi option. Wi-Fi networks using 5GHz have more channels and bandwidth available, which may improve performance in areas where there is excessive Wi-Fi traffic or routers.
If you are trying to add a camera that has previously been added to your account or another account, you will first need to reset the camera. This can be done by pressing and holding the PAIR button on the side or bottom of the camera until the camera beeps. Try to pair again after the reset.
Make sure the Wi-Fi on your Android or iOS device is enabled prior to adding the camera.
Try to disable Mobile Data on your Android or iOS device, then try to pair again.